renv::restore()Get Started with Your Environment
The following instructions provide a step-by-step workflow to set up your work space. In general, you will need:
Required/Necessary
- A GitHub Account
- Git
- R version 4.5.2 (2025-10-31)
- If possible, utilize R 4.5.2, as this is the version utilized in the repository.
- Otherwise, R ≥ 4.1 should be compatible, so long as your version of R is compatible with the R package versions in the environment.
- RStudio (recommended) or Positron
- These are suggested IDEs for writing and running code. We recommend RStudio.
- Both come bundled with Quarto, which is used for writing the reports and comparisons, so no additional setup is needed on your part.
Optional
- SAS
- Requires a paid license.
- Python version 3.12.6
- You will not need to separately download Python. In the configuration of this project through subsequent steps, a virtual environment of Python is activated and installed.
Set up Git, GitHub, RStudio
You will need to download and setup GitHub, Git, R, and RStudio in order to contribute to CAMIS. Please see the above links to download and configure these for your system.
In setting up and connecting your RStudio and GitHub accounts, Jenny Bryan has a great book, Happy Git with R, where she talks in much greater depth on connecting RStudio and GitHub.
Specifically, Happy Git with R covers:
- Registering for a GitHub Account
- Installing Git and An Introduction to Git
- Configuring Personal Access Tokens and
- Connecting Git, GitHub, and RStudio
At this point, we assume you have the necessary configurations setup and have RStudio connected to GitHub (not necessarily to the CAMIS project yet).
Fork the CAMIS Repository
Next, navigate to the CAMIS Repository and fork the repository. Forking the repository will make a copy of the CAMIS repository within your GitHub repository list. This will allow you to make changes and contribute Pull Requests to CAMIS.
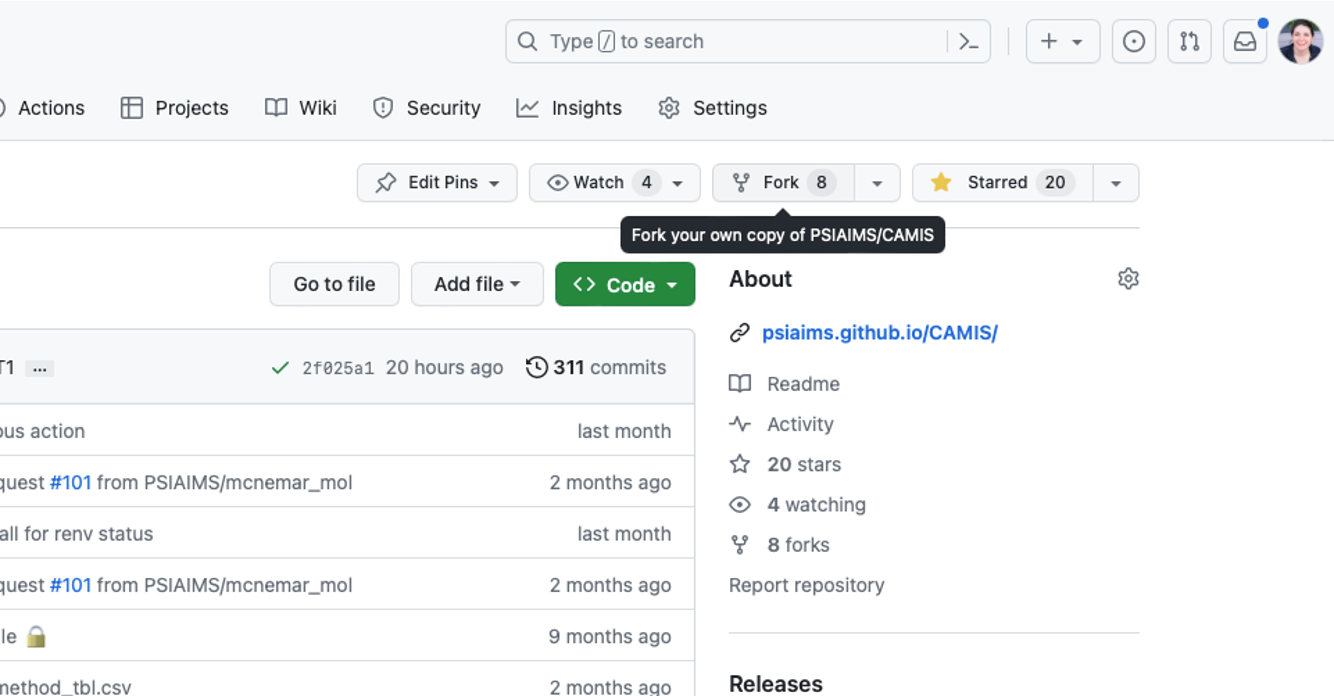
Now you will have a copy of the CAMIS repository in your list of repositories on GitHub.
It is really important to understand the next steps in forking and cloning repositories. Before moving on to the next steps, please read the Happy Git with R Chapter on Fork and Clone. If you are looking to make changes, add a document or comparison, or some other feature through a pull request, you must take some steps in order to properly set up your forked repository. Jenny does a great job walking through the details and differences of upstream, origin, and describes some handy functions to help get your fork properly configured.
Clone to Your Own Computer
If you follow the instructions in Happy Git with R Chapter on Fork and Clone, you can jump to this section.
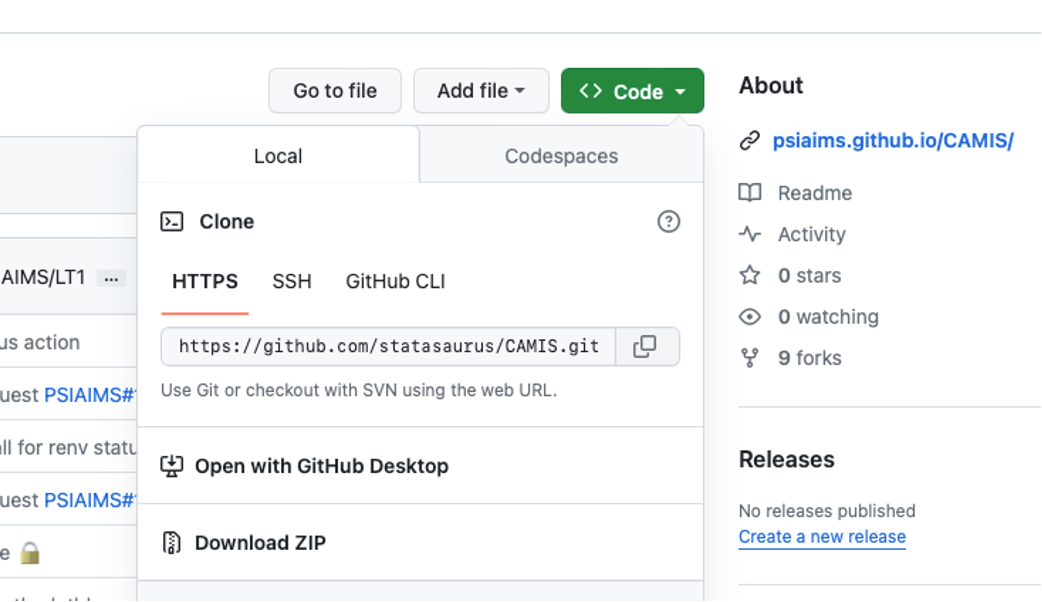
Once you’ve created a copy of this repository, you’ll need to clone it from GitHub to your computer. Click the “Code” button to do this.
The method you’ll use, either “HTTPS” or “SSH”, depends on how you’ve connected your computer to GitHub. If you’ve set up using a PAT, select the “HTTPS” tab. If you’ve used “SSH”, then choose that tab. Either way, you will need to copy the location in the box.
Create an RStudio Project with Version Control
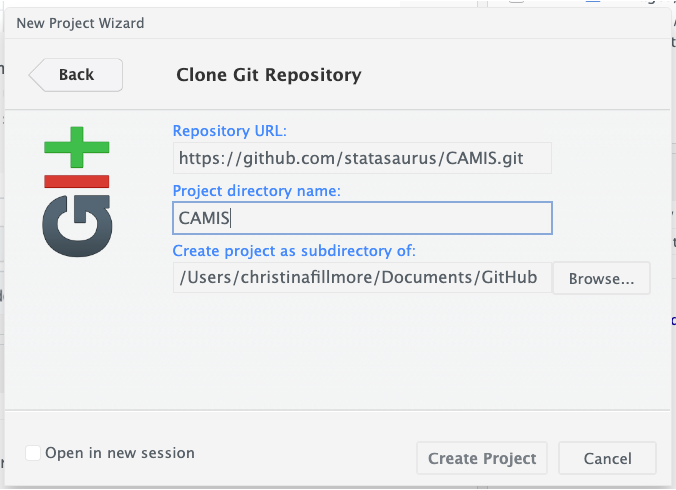
In RStudio, you will need to create a new project and select “Version Control” in the project wizard. Then you will select “Git” and finally paste the location copied from GitHub into the URL box. Finally hit “Create Project” and you should be good to go!
Setting up CAMIS with renv
The CAMIS repository utilizes renv, which is an R package that helps create reproducible environments. Assuming you downloaded R 4.5.2, which is the version of R associated with this renv project, everything should be relatively straightforward.
If you have R ≥ 4.1, you generally shouldn’t have issues, but renv will alert you that R 4.5.2 was used to install the packages and that R 4.5.2 is different than the R version you are using. As more R packages are added/updated in CAMIS renv, there may arise issues if your R version differs greatly from R 4.5.2. This may require you to install a version of R closer to R 4.5.2, so please work with your appropriate technology professional to upgrade R.
If you do not have the renv package, you can install it using:
install.packages("renv@1.0.10") This will install the same version of renv as the CAMIS Repository utilizes. Next, you will need to install the specific R and Python packages associated with CAMIS. This can take some time if you do not have some of these already downloaded. Again, because this is a reproducible environment with specific versions of packages (these are listed in a renv.lock file), specific versions of these packages will be downloaded and install into this environment. To install these, run the following code:
Again, this may take some time to install these packages and requirements. There can be some systems that are not as compatible or may require the installation of other systems outside of R packages. Often, these are related to systems or software for installing the binary packages of R. Please refer to those user manuals and other online resources for their installation. Make sure you have the necessary permissions for installing them.
As you make contributions to CAMIS, you may also need to add new packages to the renv.lock file. You must use renv to manage and install these packages like:
renv::install("package_name")It is also recommended after installation to snapshot these changes using:
renv::snapshot()
renv::restore()
These function calls help to record and update the renv.lock file with the package and associated dependencies in a reproducible manner.
At this point, it is assumed that your system in RStudio is connected to Git and GitHub, and that the renv environment is successfully activated. Now every time you close RStudio and reopen the CAMIS project on your computer, you should see the option:
- Project '(path/to/CAMIS/project)' loaded. [renv 1.0.10] Create a Branch in RStudio
Now you should have an RStudio Project that contains all of the CAMIS Repository files. A highly recommended step is to create a new branch. A branch separates any changes you make in the forked repository from the Main branch. This allows you to more easily keep up with changes from the CAMIS Repository on the upstream branch.
To create a new branch, find the “Git” tab (top right corner) in RStudio. Select the icon to create a new branch. You can name the branch anything, but its helpful to match it with the changes you intend to make. Within the box that comes up, ensure the drop down for Remote is set to “origin” and the option “Sync branch with remote” is checked.
Contribute Your Changes
Now you can add and edit various files within the CAMIS project. If you are looking for templates to get you started in comparing R packages or comparing specific methods between coding languages, see the templates for only a Single Language or for comparing Multiple Languages. These templates are good starting points to model off of, and we recommend you keep the structure similar. Also see How to Review an R Package for some other guidance.
If you are adding SAS-related examples, add those to the SAS/ folder. R-related examples should be added to the R/ folder. Similarly, Python-related examples should be added to the Python/ folder. For examples that compare two or more languages (i.e. SAS vs R), add these examples in the Comp/ folder Follow the naming convention of the files already stored in those folders.
Commit Changes and Push to Remote
Within Rstudio, commit each change or new file added, and push these changes to your forked repository. Once you have completed all of the change you want to make, it is time to create a pull request. Before you start creating a pull request, check that your branch on GitHub contains all the changes you want. If your branch on GitHub doesn’t contain all your changes, commit and push those from RStudio.

Create a Pull Request
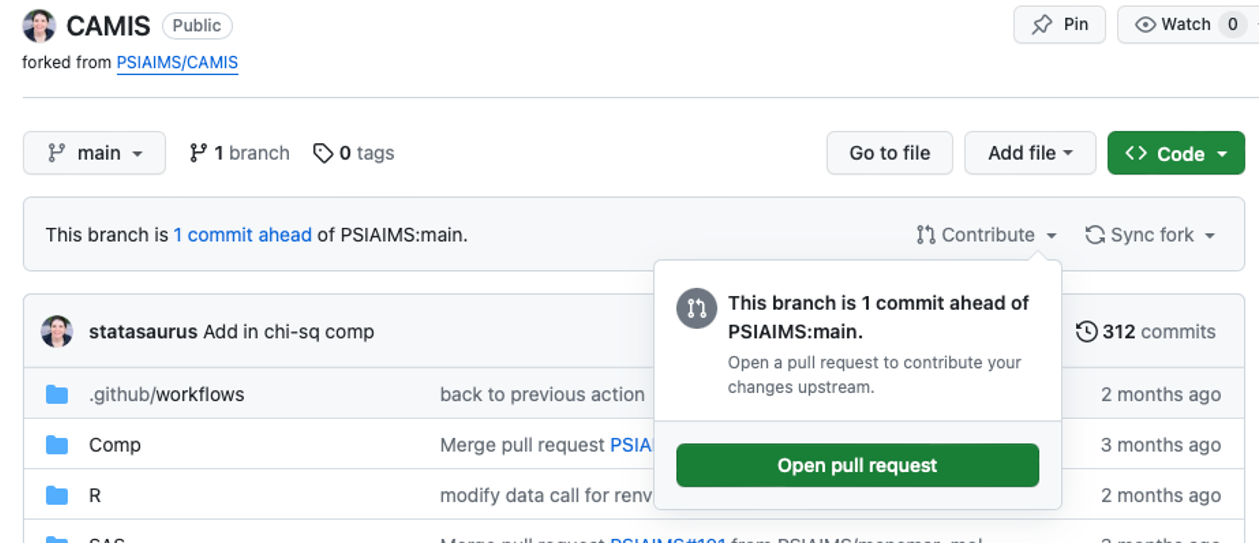
Back on your fork on GitHub, you will see that your repo is now ahead of the main CAMIS repository. The first thing you want to do is make sure that your forked repository is in sync with the main CAMIS Repository. Sync your own main branch first and then sync your the branch with your desired changes. Click ‘Sync fork’:
If you are having issues on syncing with upstream, Happy Git with R has some guidance. If you have merge conflicts or other issues, Happy Git with R has some recommendations for how to start resolving these.
Now that you are all synced with main, you can create a pull request by clicking on ‘Contribute’ and then ‘Open pull request’. This brings you to a page where you can explain your pull request. It is often helpful to describe the changes you made to make reviewing the pull request easier and the reviewers can better understand your intended changes. If there are any relevant issues that your pull request is related to, also include and link those issues.
For more details about making pull requests see create a pull request.
Once your change is approved, and merged into main, you will be able to see your changes on the main CAMIS GitHub repository. You can then delete your branch in your forked repository and sync any other branches with the upstream CAMIS repository.